Using the Rasa framework to implement a simple medical diagnosis bot
Published 2020-04-26
Table of Contents
While in lockdown, and after stumbling across a number of tweets and blog posts discussing how effective it is, I decided to spend some time getting familiar with the Rasa conversational AI framework. I understood that Rasa was capable of intent classification and entity extraction within conversational text and I was keen to understand how I could implement a simple bot which could take some text from a user, extract some entities, process them in some way before responding to the user based on the outcome of that data processing processing. With these steps in mind, I thought a simple diagnosis bot in which extracts user symptoms from text, compares them to a list of known illness, and suggests a diagnosis would be an ideal starting point.
In this blog post I will summarise my approach and the main steps involved to implement this kind of a bot within the rasa framework. While this post aims to cover the “key points”, you can read Rasa’s extensive documentation here. As always the full code for this tutorial is available from my GitHub repository. I have also created a separate repository containing a jupyter notebook which handles some of the data prep work involved before coding within the Rasa framework.
My approach
Before we dive into any of the code I will attempt summarise my approach to performing the diagnosis based on the symptoms described by the user.
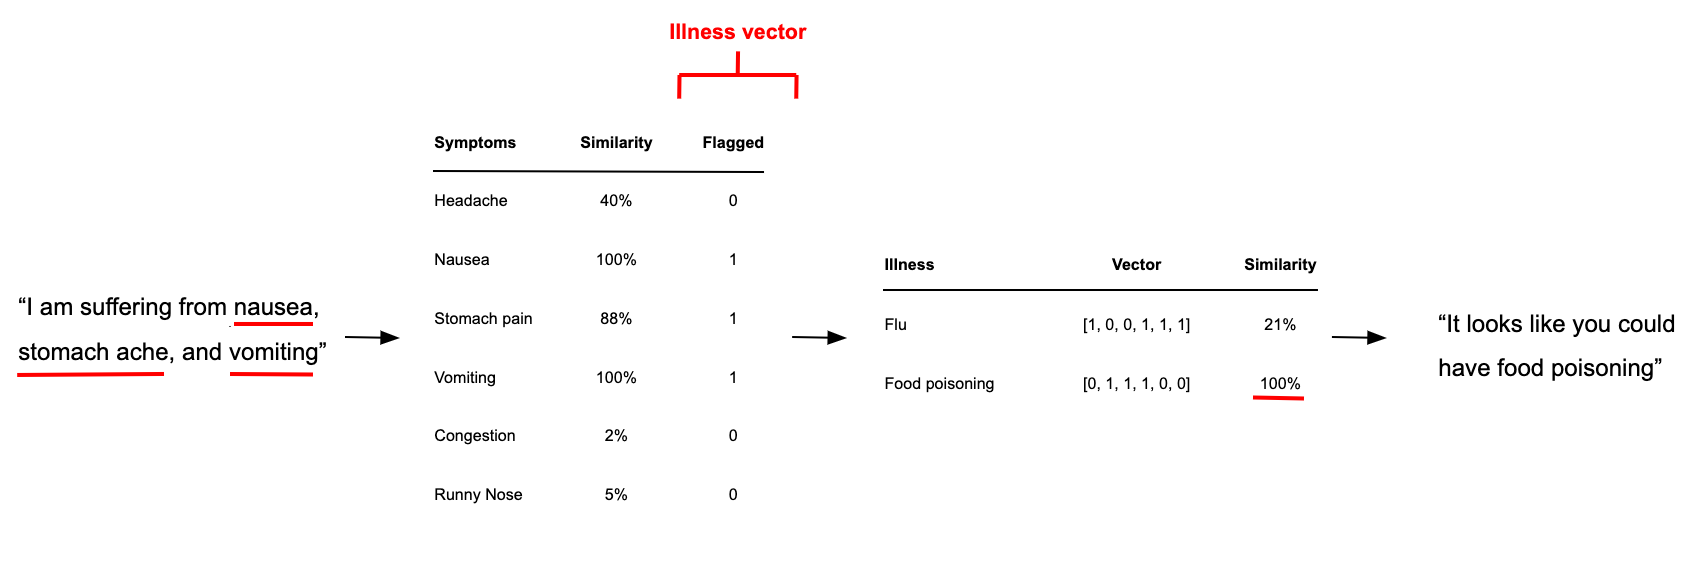
Outside of Rasa’s built in intent classification and entity extraction models, this will be unsupervised modelling approach and can be broken up into 5 steps (figure 1):
-
Extract symptoms (as entities) from the users message using Rasa’s built in entity extraction functionality.
-
Convert each symptom to a sentence vector using spaCy.
-
Compare this vector to a dataset of known symptoms (and their vectors) based on cosine similarity and flag any symptoms which appear (similarity threshold = 85%) in a binary “illness” vector
-
In a similar fashion compare the illness vector of to a dataset on known illnesses
-
If any illness is > 50% similarity, diagnose user with most similar illness, otherwise inform user there is no diagnosis.
It’s worth pointing out that I chose to use a cosine similarity based approach for the illness vector comparison as it will handle cases whereby a user experiences 2 out of 2 symptoms of one illness in addition to 3 others not associated with the illness.
If you are unfamiliar with the concept of cosine similarity and word/sentence vectors, or you are just not sure how to implement them in Python, I would recommend you have a quick read of my blog post on the topic.
Data Preparation
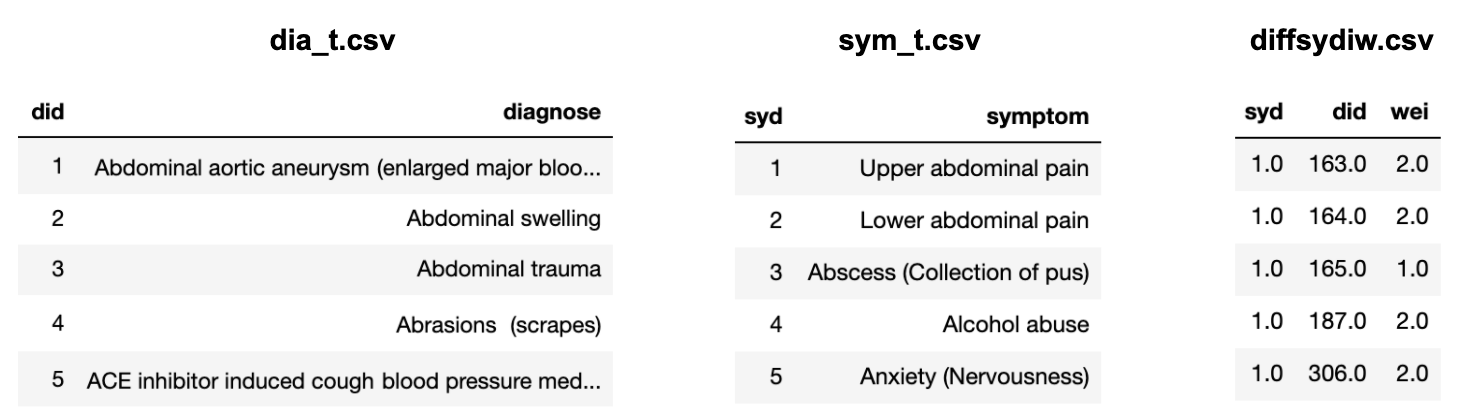
The dataset used to prepare the symptom and illness data used in this tutorial was acquired for Kaggle. This dataset contains a listing on a number of illnesses and their corresponding symptoms spread across three main files:
-
dia_t.csv: A list of ~1,000 illnesses and their corresponding illness ID.
-
sym_t.csv: A list of ~200 symptoms and their corresponding symptom ID.
-
diffsydiw.csv: A list off illness IDs and the corresponding symptom IDs
Symptoms data
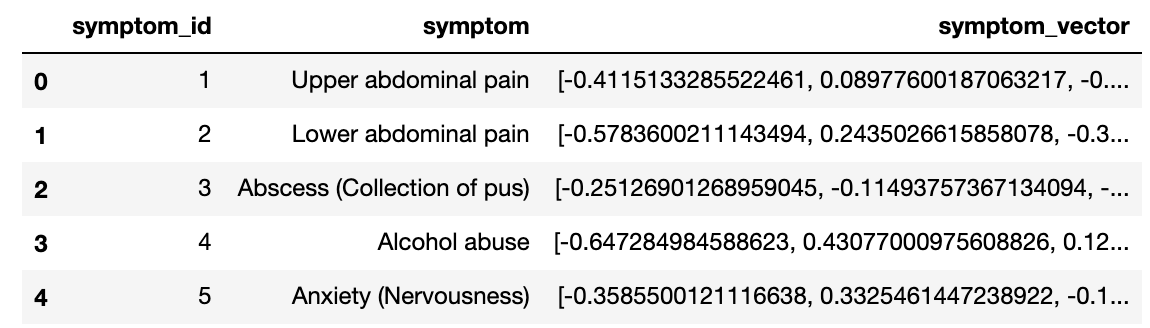
The first data preparation task was to generate an embedding vector for each symptom in sym_t.csv. To achieve this I simply created a function which leverages the spaCy vector method to convert each symptom into a 256-D vector. I could then apply this function to the symptoms dataframe.
import pandas as pd
import spacy

nlp = spacy.load('en_core_web_md')

def get_sentence_vectors(text, nlp):

    # get tokens for each word in sentence
    embedding = nlp(text).vector.tolist()

    return embedding

symptom_df = pd.read_csv('data/sym_t.csv')

symptom_df['embedding'] = symptom_df.apply(
    lambda row: get_sentence_vectors(row['symptom'], nlp), axis = 1
)
Illness data
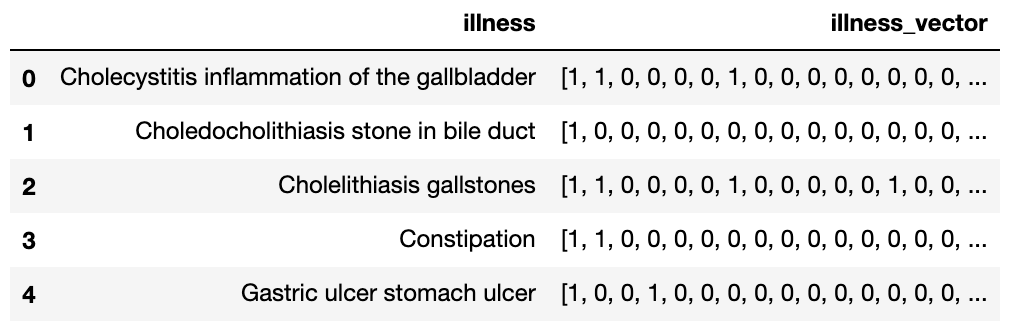
Once complete, the next data prep step was to create a binary symptom vector for each illness in our dataset. This vector would simply flag (with a 1 or 0) the symptoms for each illness in our dataframe.
To achieve this, I merged the symptom and illness datasets together using the relationship described in diffsydiw.csv. Once done, I was able to loop through each illness in the dataset, identify the corresponding symptom IDs, create a binary list of symptom ID’s, and append it to a dataframe alongside corresponding illness.
import pandas as pd

source_data = links_df.merge(
    illness_df, on="did"
    ).merge(
    symptom_df, on="syd"
)

# remove any missing data and select columns we need
source_data = source_data.loc[
    ~(source_data['symptom'].isna()) & ~(source_data['diagnose'].isna()),
    ['did', 'syd', 'diagnose', 'symptom']
]
source_data.columns = ['illness_id', 'symptom_id', 'illness', 'symptom']

# list of illness
illnesses = list(source_data['illness'].drop_duplicates())

# list we will use to store our illness vectors
symptom_vectors = []

for illness in illnesses:

    illness_symptoms = list(source_data.loc[source_data["illness"]==illness, 'symptom'].drop_duplicates())

    symptom_df["related_to_illness"] = 0
    symptom_df.loc[symptom_df["symptom"].isin(illness_symptoms), "related_to_illness"] = 1


    symptom_vectors.append(list(symptom_df["related_to_illness"]))

diagnosis_data = pd.DataFrame({
    "illness":illnesses, "illness_vector": symptom_vectors
})
Training data
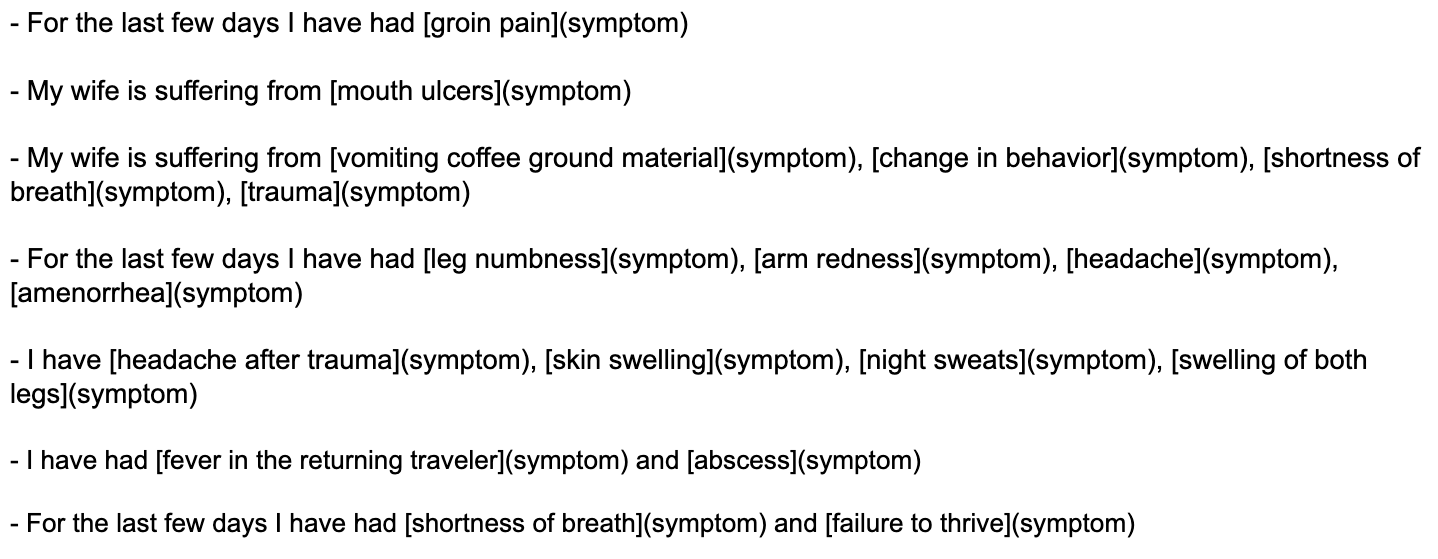
The final data preparation step (you will be glad to read) involves generating some training data for the Rasa model. The training data will consist of example messages from users describing their symptoms in which each symptom is flagged as an entity for the rasa entity extractor. For example, the message “Hi, I have a headache” would be reformatted as “Hi, I have a [headache](symptom”.
Ideally one would collect data based on real user interactions with an earlier version of the chat system and tag the entities. However in our case since we have no previous examples of user interaction, we will have to generate examples ourselves. To generate the training data I looped through the symptoms dataframe taking samples and sometimes combining them before appending them to different beginnings/endings. This approach generated 400 training examples for the model, a sample of which can be seen below. Note that the code used to generate this didn’t fit nicely into this webpage, however can be viewed in my data prep repository.
Rasa
Once the data is prepared and ready to go, setting up an initial version of the bot in Rasa is extremely straight forward. In this section, I will talk through the four main files we need to update in the repository and how they fit into the overall Rasa framework in simple terms before training and interacting with the model!
Domain (domain.yml)
I like to think of the domain file as the rasa component which tracks the bots main functionalities. In this file we define:
-
Intents: A collection of user intents we expect our bot to encounter (symptom description, greet, affirm, deny, etc.).
-
Entities: Names for specific pieces of information we want our bot to be capable of identifying within user messages. In our example the only entity is the users symptoms.
-
Slots: Any pieces of information (such as the user symptoms) that we want our bot to keep in memory during the course of the conversation with the user, and the datatype of that piece of information (text, boolean, float, list, etc). Since the user may describe multiple symptoms in our use case, we set the symptom entity slot to type list.
-
Actions: A collection of actions our bot will be capable of performing. These can simply be responses (utterances) to the intents listed above (utter_greet, utter_goodbye, etc.), or they can be a name for a custom action (described later) which will do something with the symptoms described by the user (action_diagnose_symptoms).
-
Templates: This section lists the standard responses (see snippet below) our bot will produce. Each of these templates should map to an action listed in the actions section.
templates:
  utter_greet:
  - text: "Hello, I am a symptom diagnosis bot. What are your symptoms?"

  utter_goodbye:
  - text: "Bye"

  utter_iamabot:
  - text: "I am a bot, powered by Rasa."

  utter_no_problem:
  - text: "No problem!"
Stories (stories.md)
The stories file contains the blueprint for conversations we expect to take place between the user and our bot. If you look at the stories.md file contained within my repository, you will notice that I have only outlined a small number of potential dialogues, and only 1 (get_diagnosis) contains more than one interaction between the user and the bot.
The format of each story is relatively straight forward, we simply outline what we expect the user to say (i.e. their intent) followed by how the bot should react to it. If we take a look at the get_diagnosis story from my repository you will see that in a typical interaction we expect the user and the bot to greet eachother. From here the user will describe their symptoms, the bot will then diagnose their symptoms before the user says thanks and they say goodbye to each other.
## get_diagnosis
* greet
  - utter_greet
* describe_symptoms
  - action_diagnose_symptoms
* gratitude
 - utter_no_problem
* goodbye
  - utter_goodbye
Your use case, understanding of the domain, and the number of functions you want your bot to serve should dictate how comprehensive your stories file needs to be. For example, if we were building this bot to be deployed in the real world we would need to collect much more information from the user such as gender, age, medical history before we make a diagnosis. We would also need to be able to handle situations where users may be feeling frustrated or stressed and wants to talk to a human. These are all things you will need to consider when putting together your stories.
Natural language understanding (nlu.md)
The NLU component of the Rasa framework contains the data/examples that will be used to train the Rasa intent model. The NLU.md file should contain examples of each intent and entities flagged in the domain file.
In our example, we can see (below) that that this is where we inserted the the training data prepared earlier. Again, the more samples and variety you can provide in this training data, the better your bot will be at understanding the users questions.
## intent:gratitude
- Thank you
- Thanks a million
- thanks so much
- Great, thank you

## intent:describe_symptoms
- I don't feel well, I have [blurry vision](symptom)
- My child is suffering from [pelvic pain](symptom)
- My wife is suffering from [upper abdominal pain](symptom) and [chest burning](symptom)
- For the last few days I have had [tired](symptom) and [arm cut](symptom)
...
Custom Actions (actions.py)
The actions.py file allows us to define any custom data processing or dynamic responses want our bot to perform. In our example, we use actions.py to trigger a set of functions which takes in a list of user symptoms, converts them to a vector format, attempts to match the to a list of known symptoms , before making a diagnosis based on the illness vector created (exactly like the process described in the data preparation section). Notice how we can output our response as a message using the utter_message method.
class ActionDiagnoseSymptoms(Action):

    def name(self) -> Text:
        return "action_diagnose_symptoms"

    def run(self, dispatcher: CollectingDispatcher,
            tracker: Tracker,
            domain: Dict[Text, Any]) -> List[Dict[Text, Any]]:

        symptoms = tracker.get_slot("symptom")

        # encode each symptom
        encoded_symptoms = [encode_symptom(symptom) for symptom in symptoms]

        # create a binary vector of symptoms to compare to each each documented illnedd
        illness_vector = create_illness_vector(encoded_symptoms)

        # perform diagnosis
        diagnosis_string = get_diagnosis(illness_vector)

        dispatcher.utter_message(text=diagnosis_string)
It’s worth highlighting here that in an attempt to keep the core Rasa files as clean and understandable as possible, I created a separate file (diagnosis_functions/diagnose.py) which contains the encode_symptom, create_illness_vector, and get_diagnosis functions. You can see how these work by looking at the code in the repo.
Training and interacting with the bot
Once we have the above components set up and ready to go, we can train our model and start having some conversations!
Training the model is extremely straight forward and is simply a case of running the below command. For our simple use case the training process takes roughly 5 minutes. Obviously the training time is entirely dependant on the complexity of your bot, the number of training samples in your nlu.md file, and the hardware in your machine.
$ rasa train

Once training is complete, we can run the $ rasa shell command to start a conversation with our bot.
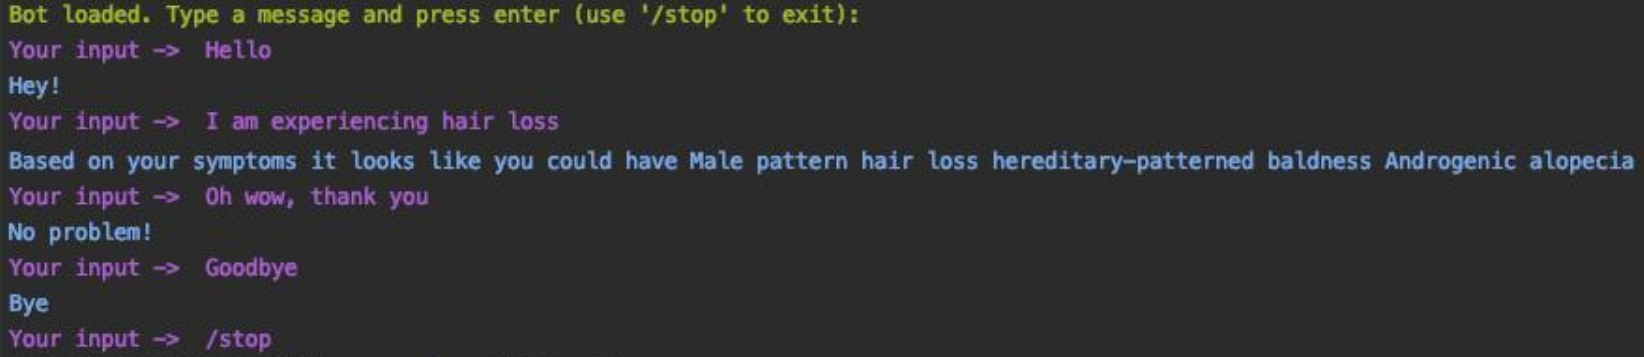
It is worth noting that you may need to uncomment the endpoints.yml file to configure the custom actions endpoint to run on localhost:5055 before running the $ rasa shell command (something I wish I knew before starting).
# This file contains the different endpoints your bot can use.

# Server where the models are pulled from.
# https://rasa.com/docs/rasa/user-guide/configuring-http-api/#fetching-models-from-a-server/

#models:
#  url: http://my-server.com/models/default_core@latest
#  wait_time_between_pulls:  10   # [optional](default: 100)

# Server which runs your custom actions.
# https://rasa.com/docs/rasa/core/actions/#custom-actions/

action_endpoint:
  url: "http://localhost:5055/webhook"
Closing thoughts
In this blog post I outlined some of the key data preparation steps and Rasa elements required to implement a simple medical diagnosis bot. Of course there are a number of ways in which this bot could be improved such as:
-
Using better training examples (based on real interactions).
-
Better training data (with more symptoms).
-
Improving the modelling approach (BERT embeddings and supervised model).
-
Improving our bot to obtain more information from the user (gender, age, medical history).
Building a sophisticated AI assistant capable of understanding the complexities of natural language and human emotion is a difficult task. Start simple, start small, improve as you go along.