Cryptography: Implementing a Vigenère cipher in python
Published 2021-04-07
Table of Contents
In this blog post I will be discussing how we can implement a Vigenère cipher in python to encode and decode messages you may want to send to a friend. Before getting stuck into the coding aspect of this tutorial, I will give a brief overview of the history of the Vigenère cipher and how it works. Before finishing up I will also give a brief overview of the weaknesses of the Vigenère cipher, and how you might go about cracking it.
As always, if you would like to access any of the code used in this tutorial, you can do so from my GitHub repository.
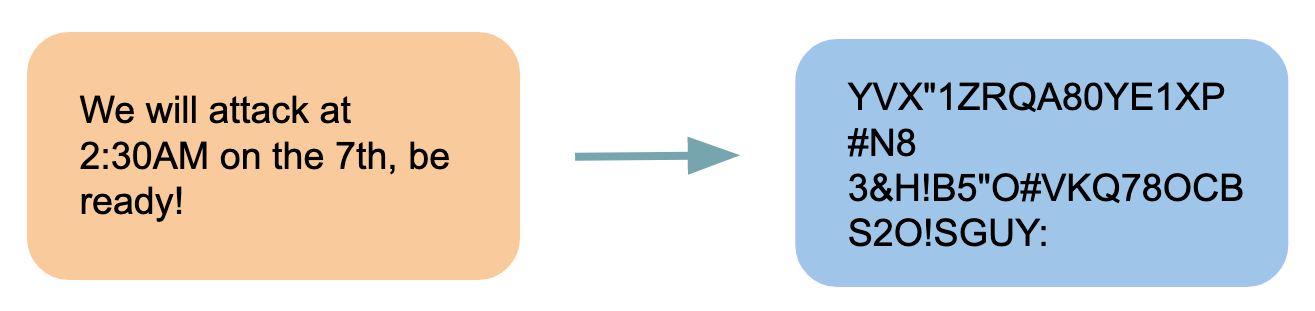
What is a Vigenère cipher?
History of the cipher
Prior the creation of the Vigenère cipher, most encrypted messages were encrypted using different forms of monoalphabetic ciphers. These ciphers are simple forms of encryption which for a given key, match each letter of the alphabet (or number) in the source text (commonly referred to as the plaintext) to one other character in the encrypted text. A common, and easy to understand monoalphabetic cipher is the Caesar cipher. In the Caesar cipher, each letter in the plaintext is simply encrypted to a letter in the encoded text according to a predefined offset. For example if we want to encode all the letters in the alphabet using a Caesar cipher with an offset of 3, we would simply shift each letter 3 places such that “A” would encode to “D”, “B” to “E” and so on as illustrated in Figure 1.

Using this cipher we could encode the message “HELLO” to “KHOOR” and someone who receives this message could simply decode it by looking up each letter in the encoded text row and mapping it to it’s plaintext value.
The problem with this type of cipher is that since each letter in the plaintext only maps to one letter in the encoded text, it is very easy to break using a technique known as frequency analysis. The intuition behind this technique is quite simple, one analyses how often the different letters appear in the cipher text compared to how often they would expect them to occur in the plaintext in an attempt to figure out the offset. For example in an English text, we would expect letters such as “A”, “E” and “I” to occur quite frequently so it may be reasonable to assume that the 3 most occurring letters in the encoded text match to these values. Additionally, we know that in English a “Q” is almost always followed by a “U” so we could look for any letter which doesn’t occur that often but is always followed by the same letter when it does to figure out what “Q” and “U” are encoded as.
The Vigenère cipher, originally inspired by the work Leon Battista Alberti in 1460 and later formalised by Blaise de Vigenère in 1586 is a polyalphabetic cipher, which means that unlike monoalphabetic ciphers, each letter in the plaintext can be mapped to multiple letters in the encrypted and each letter in the encrypted text can be mapped to multiple plaintext letters depending on its position in the text and the key used to encode the message.
How it works
Overview
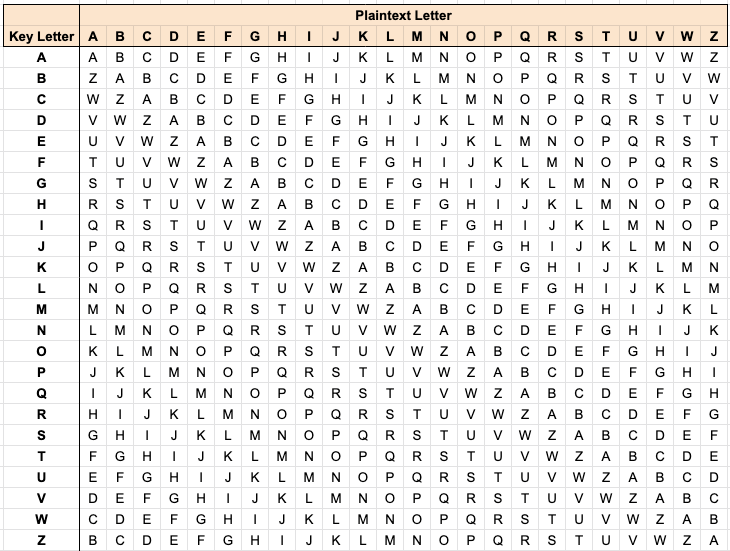
To encode a message using a Vigenère cipher we begin by setting up a Vigenère square (as illustrated in Figure 2). A Vigenère square is simply an NxN matrix which contains a row and column for each letter we want to be able to encrypt using the cipher. Each row in the table is then simply a Caesar cipher mapping for each letter (to the columns names) in the table. If we wish to encode a message using the Vigenère square, will first select a key phrase to encode the message, then simultaneously iterate through each letter in the plaintext and in the key phrase encoding each letter in the plaintext according to the corresponding row based on the letter in the key word. Of course, the length of the keyword may be shorter than the length of the plaintext, and in this case we simply loop back over the key phrase until all letters in the plaintext are encoded.
Example
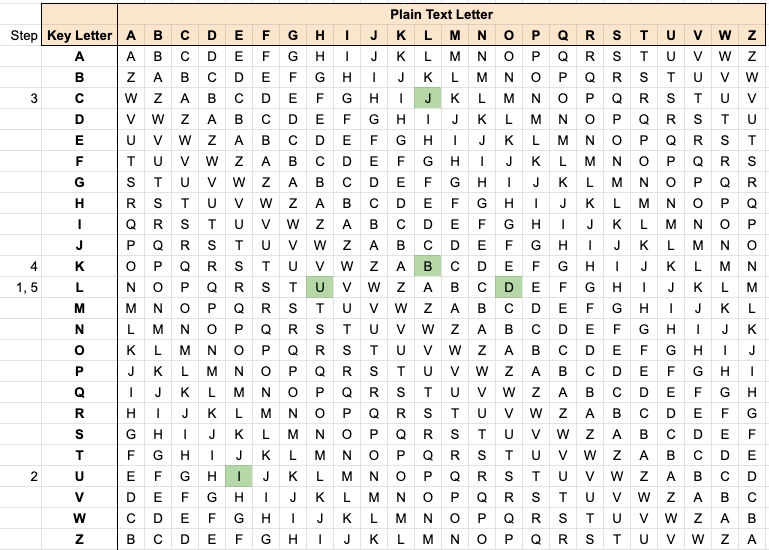
This kind of thing is often easier to understand by stepping through an example so let us consider an example whereby we want to encode the phrase “HELLO” using the Vigenère square described in Figure 2 using the keyword “LUCK”. To encode this message we would:
-
Begin by using the key letter “L” to encode the letter “H” to an “U” (see position (L, H) on Vigenère square below).
-
Next we move to the next letter in the keyphrase “U” and encode “E” as an “I” (U, E)
-
From here we use the next letter in the key “C” to encode the letter “L” as a “J” (C, L)
-
Next we use the last letter in our keyphrase “K” to encode the next “L” to a “B” (K, L), notice how now both letter L’s are encoded differently
-
Now since we have run ut of letters in our keyphrase, we will simply go back to the first letter “L” and encode the “O” as a “D”.
Using the steps described above, we can encrypt the word “HELLO” to “UIJBD” using the keyphrase “LUCK” and the Vigenère square described in Figures 2 and 3.
Implementing the Vigenère cipher in python
Now that we have an understanding of how the Vigenère cipher works, we’re ready to implement it in python, And you will be happy to hear, that it’s pretty straight forward!
Setting up the Vigenère square
We will start by setting up the code required to generate our Vigenère square. Now unlike the examples above, we wont just deal with the letters A through Z (in upper case), we will also include the digits 0-9, a standard whitespace character, and the punctuation characters available in python’s string module. As a result of this, the Vigenère square will be too big to visualise like we have previously, but hopefully you have the picture of how this works by now.
As you will see in the code block below, we begin by defining a list object containing the available characters for our cipher.
From here we will define two dictionaries, one which map each character to a number, and another which maps those numbers back to the same character. This will just allow us to to offset each row in the Vigenère square as we iterate through it during creation.
Next we will create the Vigenère square (see variable encoder) by creating a dictionary for each available character, where each key in the dictionary corresponds to a key letter (a row basically) and the value for each key is another dictionary which maps the plaintext value to the encoded value for that row. For example, encoder['B'], row 2 in our Vigenère square would contain the following key, value pairs: {'A': 'B', 'B': 'C', 'C': 'D', 'D': 'E', 'E': 'F', 'F': 'G', 'G': 'H',...}. Here we can see that the letter “A” encodes to “B”, “C” to “D”, and so on. if we were to look at encoder['C'], it would simple offset each letter by one again.
To make it easier for us to decode the messages later on, while creating each row of the Vigenère square in the form of a dictionary for encoding the messages, we will also create a decoder dictionary which will essentially be the exact same as the encoder except the key, value pair for each row will allow us to go from encoded text back to plaintext. For example the values for row 2 in our decoder (decoder['B']) will be {'B': 'A', 'C': 'B', 'D': 'C', 'E': 'D', 'F': 'E', 'G': 'F', 'H': 'G',...} (i.e. the reverse of encoder['B']).
available_characters = list(string.ascii_uppercase) + [str(i) for i in range(10)] + list(string.punctuation) + [" "]

# two dictionaries we will use to map characters to itegers and vice versa
base_char_int_mapping = {}
base_int_char_mapping = {}
i = 0
# create a dictionary of characters to integer mappings, we will use ths to make the vinegere square
for character in available_characters:
    base_char_int_mapping[character] = i
    base_int_char_mapping[i] = character
    i+=1

# determine the max value so we know when we need to roll back to 0
max_char_value = i-1

# loop through each character and encode the character by adding an
# offset to it for each letter in the available characters
offset = 0
encoder = {}
decoder = {}
for key_char in available_characters:
    key_encoder_lookup = {}
    key_decoder_lookup = {}
    for plain_text_char in available_characters:
        offset_char_int_value = base_char_int_mapping[plain_text_char] + offset
        if offset_char_int_value > max_char_value:
            offset_char_int_value = offset_char_int_value - max_char_value - 1
        offset_character_mapping = base_int_char_mapping[offset_char_int_value]
        key_encoder_lookup[plain_text_char] = offset_character_mapping
        key_decoder_lookup[offset_character_mapping] = plain_text_char
    encoder[key_char] = key_encoder_lookup
    decoder[key_char] = key_decoder_lookup
    offset +=1
Now that we have our encoder and decoder set up, the process of encoding and decoding messages is incredibly straight forward!
Encode messages
To encode our messages, we will set up a function called encode_message. This function will take in a message that we wish to encode, a keyphrase to encode it with, and an encoder object (i.e. the encoder we created above).
The function will first replace any new line characters with a space (since our encoder doesn’t support new lines but if you want to add it in, you can). From here we will define a list which we will store the encoded message and convert our keyphrase to a list so we can iterate over it. Note that we replace any unsupported characters in the key with a “_”.
Once we have the lists set up, we can simply iterate through our message, and key, look up that characters encoded value based on the key, and append it to our encode_message list. You will notice also that at the start of each iteration we will check if we have reached the end of our keyphrase, and if so we will go back to the start (i.e. set key_index = 0).
Once each letter is encoded and stored in our encode_message list we will simply join that list together and return it as a string.
def encode_message(message, key, encoder):
    # first lets remove any \n from the message
    message = message.replace("\n", " ").upper()
    encoded_message = []
    key_index = 0
    # convert key to list and replace any unsupported characters in the key with a _
    key_as_list = [
        key_character if key_character in encoder.keys() else "_" for key_character in list(key)
    ]

    # iterate thorugh each character in the message we want to encode and encde it
    for character in message:
        # need to go back to the start of the key if we reach the end
        if key_index > len(key_as_list) -1:
            key_index = 0
        # figure out which character in the key we need to encode based on
        key_character = key_as_list[key_index]
        # first if the character isn't covered lets just encode it as a _
        if character not in encoder.keys():
            encoded_message.append("_")
        else:
            encoded_message.append(encoder[key_character][character])
        key_index+=1

    return "".join(encoded_message)
Decode messages
Once we have the function set up to encode messages, the process of creating a function to decode messages is incredibly straightforward since we can reuse basically all the code (you could probably just convert these into one function with 2 modes).
In this function, we once again iterate through each letter in the encoded message and keyphrase except instead of looking up in the encoder dictionary, we will use the decoder we created. Once again, when we have each letter decoded and stored in a list, we will join it up and return it as a string.
def decode_message(message, key, decoder):
    # first lets remove any \n from the message
    message = message.replace("\n", " ").upper()
    decoded_message = []
    key_index = 0
    # convert key to list and replace any unsupported characters in the key with a _
    key_as_list = [
        key_character if key_character in decoder.keys() else "_" for key_character in list(key)
    ]

    for character in message:
        # need to go back to the start of the key if we reach the end
        if key_index > len(key_as_list) -1:
            key_index = 0
        # figure out which character in the key we need to encode based on
        key_character = key_as_list[key_index]
        # first if the character isn't covered lets just encode it as a _
        if character not in decoder.keys():
            decoded_message.append("_")
        else:
            decoded_message.append(decoder[key_character][character])
        key_index+=1

    return "".join(decoded_message)
Example output
# Encode
message = "We will attack at 2:30AM on the 7th, be ready!"
keyphrase = "CRYPTOGRAPHY"
encoded_message = encode_message(message, keyphrase, encoder)
print(encoded_message)

# Output
# YVX"1ZRQA80YE1XP#N8 3&H!B5"O#VKQ78OCBS2O!SGUY:


# Decode
decoded_message = decode_message(encoded_message, keyphrase, decoder)
print(decoded_message)


# Output
# WE WILL ATTACK AT 2:30AM ON THE 7TH, BE READY!
Cracking a Vigenère cipher
At this stage you may be wondering how you might crack a Vigenère cipher without the key or Vigenère square. The main weakness of the Vigenère cipher is the fact that the key (and by extension the Caesar cipher) repeats itself every time we reach the end of the key, so to crack a Vigenère cipher we can simply think of it as a set of N Caesar ciphers which encode different parts of the message.
For example if a long message is encoded using the keyphrase LUCK, the 1st, 5th, 9th, etc. letter will be encoded using the same Caesar cipher based on the key letter “L”, while the 2nd, 5th, 10th, etc. letter will be encoded using the Caesar cipher for the letter “U” (and so on).
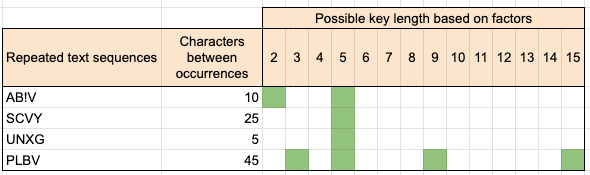
We can determine the length of they keyphrase used by looking for groups of letters of length 4 or more (i.e. words) that appear next to each other a couple times in the text and count the number of characters between each occurrence. Once we have done this for a few sequences we can look at the factors for the number of characters that appear between each occurrence and make a guess at the key length. For example, in Figure 4 below we can make a guess at a key length of 5 based on the factors of the number of characters between each occurence of a repeated sequence in the encoded text.
From here we can use frequency analysis on each of the individual Caesar ciphers to identify the most common letters, we could also plot and examine the graphs of the letter distribution for each cipher to determine the offset of the characters (note this gets difficult if the cipher includes numeric or special characters), as they should follow a similar shape with different offsets.
Once you have identified a handful of letters from each Caesar cipher and the offset you can work your way back to offset 0 and decrypt the text.
Some ways you can make it harder for people to decode your Vigenère cipher messages include:
-
Adding numeric and special characters to your Vigenère square
-
Use a long keyphrase when encrypting your messages
-
Send shorter encrypted messages so that the person trying to crack your code wont be able to identify any repeating words
-
Change the key you are using to encrypt your messages often (and make sure to tell the other person!)
Closing thoughts
In this blog post we learned about the Vigenère cipher, it’s history, it’s weaknesses, and how to implement it in python. While the Vigenère cipher is weak by today’s encryption standards, it provided a template for future, more sophisticated encryption techniques to follow (for example enigma is essentially just a Vigenère cipher where they keyphrase never repeats).
If you are interested in learning more about cryptography, I would recommend The Code Book by Simon Singh which served as inspiration for this blog post and gives a great overview of the history, and future of cryptography in a way that is very easy to understand. Also if you would like to access any of the code used in this tutorial, you can do so from my GitHub repository.